
What if you want to use Photoshop, InDesign, or any software where we do not have built-in presets?
Here are the spread dimensions for layflat books like ArtBook or AriaBook
Closed Book Size (in.) |
Print Size Before Trimming (spread width x height) spread = double page |
Spread design size (px) |
| Square Formats | ||
| 4x4" | 8x4" (20 x 10cm) | 2400x1200 |
| 6x6" | 12x6" (30.5 x 15.2cm) | 3600x1800 |
| 8x8" | 16x8" (40.6 x 20.3cm) | 4800x2400 |
| 10x10" | 20x10" (50.8 x 25.4cm) | 6000x3000 |
| 12x12" | 24x12" (61 x 30.5cm) | 7200x3600 |
| 16x16" | 32x16" (81.3 x 40.6cm) | 9600x4800 |
| Vertical Formats | ||
| 4x6" | 8x6" (20 x 15.2cm) | 2400x1800 |
| 8x12" | 16x12" (40.6 x 30.5cm) | 4800x3600 |
| 10x15" | 20x15" (50.8 x 38.1cm) | 6000x4500 |
| 11x14" | 22x14" (55.9 x 35.5cm) | 6600x4200 |
| 12x16" | 24x16" (61 x 40.6cm) | 7200x4800 |
| 12x18" | 24x18" (61 x 45.7cm) | 7200x5400 |
| Horizontal Formats | ||
| 6x4" | 12x4" (30.5 x 10cm) | 3600x1200 |
| 12x8" | 24x8" (61 x 20.3cm) | 7200x2400 |
| 15x10" | 30x10" (76.2 x 25.4cm) | 9000x3000 |
| 14x11" | 28x11" (71.1 x 27.9cm) | 8400x3300 |
| 16x12" | 32x12" (81.3 x 30.5cm) | 9600x3600 |
| 18x12" | 36x12" (91 x 30.5cm) | 10800x3600 |
Send files in sRGB JPG at 300DPI.
In general, we work under an assumption that your pictures and design are made with utmost care in both the artistic and technical departments. This allows us to focus on our craft. Still, during the printing process we often encounter some of the errors listed below. Please read them carefully as we will not be responsible for imperfect results if these are found in your design.
LET IT BREATHE!
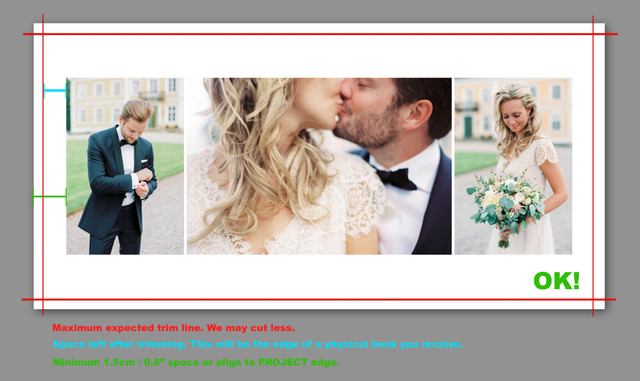
Remember that we will trim more or less of what's outside of the red lines in album preview during ordering. We do it by hand for necessity, and it isn't going to be equal between top, bottom and sides*, or from book-to-book.
*Trim is done with the book of pages folded closed, so left and right sides in a single book will be trimmed equally because they are done in a single cut. Top and bottom edges are separate, individual cuts.
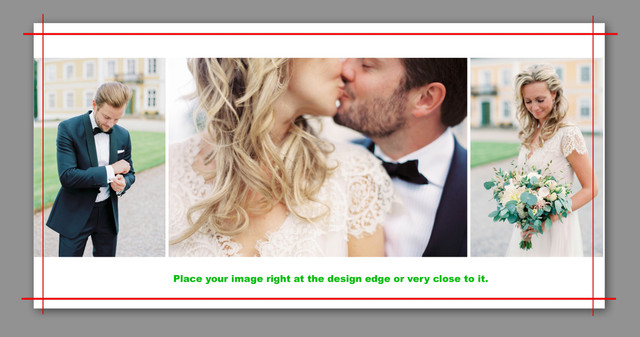
Make sure that your design "breathes" enough to allow for trimming. We try to cut as little as possible, and you may extend your images all the way to the edge of the project (full bleed), but if you have important elements like borders, heads, feet or elbows too close to the "trim line", they risk getting cut into or leaving you with an unattractive lack of space around them. If you want a nice border of background between inset images and the page edge, then keep at least 1.5 cm (0.6") of space from the edge of your design. Please do not "aim" for the red line in the preview. IT DOES NOT END WELL.

ONE DESIGN FOR BIG AND SMALL BOOK
When ordering duplicates or more importantly the DuoBooks from a single design, please remember that downsizing it for smaller books presents an issue. Together with images getting smaller, so is the safe zone between them and the edge of the project. On any single book, we recommend leaving no less than 15 mm / 1.5 cm / 0.6 in of white space from the page edge if you do not want your images trimmed into, or you don't want thin/uneven slivers of border left over. But if you intend to scale down your design from one size to another, we recommend leaving yourself some extra wiggle room.
Let's imagine your main album is 12x12" and you've designed your layouts so that they all have a simple white background with 0.5 inch borders between your images and the edges of the page. Let's say, on this book, we cut approximately 5mm (0.2") of the design in the guillotine leaving your white borders approximately 7.7 mm wide (0.3").
Now you want to use that same design to add-on a set of 6x6" DuoBooks (15x15 cm). Those are half the size of you main book, so your 0.5-inch borders when printed for the 12-inch book will now be shrunk to 0.25-inch borders on the 6-inch book. Let's say we trim that same 5mm (0.2") from the small book's pages. This will leave you with just a sliver of white border, and if we had trimmed any more, or when trims are different on each edge (as is normal) - the results can be quite disappointing. Also, the more room you have, the less you'll see the small variances.
Solution: If you intend to order smaller duplicates using the same files you prepared for your main book, please make sure that you leave extra space in the design. We recommend setting yourself a 2.5 cm safe zone.
SOFT / PIXELATED / NOISY DESIGN?
Please check your files at 100% magnification to inspect for editing artifacts (clone stamp fails) and to see if the files are sharp enough and noise levels are up to your standards. We have to assume they are.
Remember that printing on paper may slightly increase noise and we offer test prints if this is your first time printing with us, or you are trying a new paper type.
MIND THE FOLD
Are there any faces across the center line? Our creases are really tight, BUT still consider moving them away as, in addition to being viewed as distracting in some cases (not all), this area sees the most wear over time.
Please also mind that with Fuji Paper (BloomBook, AriaBook) there might be a slight decolorization in the fold. This is a normal (thus unwanted) property of darkroom photo paper.
TEMPLATE ERRORS
Some people use templates in PS or InDesign. Sometimes when you replace an image in one of the slots,
some portion of the old image still bleeds around the new one or we see a gray stripe. Please check your files in 100% magnification.